Sunum

|
Senkron noktalar, 4 eksen modunda tel yolunu zorlamak için işlenecek 2 profil üzerine yerleştirilir. |
Senkron noktaları yerleştirmek için 3 adım vardır:
-
2 profili tanımlayın
-
Senkron noktalarına ihtiyacımız olup olmadığını kontrol etmek için bir sonuç alın
-
Senkron noktalarını otomatik, manuel veya birleşik modda tanımlayın
Profilleri tanımlamak için
1/ Profilleri tanımlayın
Bir seçim kutusu yapın veya 2 profili art arda tıklayın.
Örnekte gösterildiği gibi bir elemanın ortasında başlangıç noktasını tanımlamak için:
-
Profil üzerine tıklayın,
-
Başlangıç elemanına tıklayın, imleci eleman boyunca hareket ettirin ve başlangıcı istediğiniz yere tıklayın veya düğmeye tıklayarak elemanın BAŞLANGIÇ veya ORTASINI seçin: burada ORTA seçin
-
Bitiş elemanına tıklayın (örnekte aynı eleman), imleci eleman boyunca hareket ettirin ve bitişi istediğiniz yere tıklayın veya düğmeye tıklayarak elemanın ORTASINI veya SONUNU seçin: burada ORTA seçin.

|
|
2/ Sonuç
-
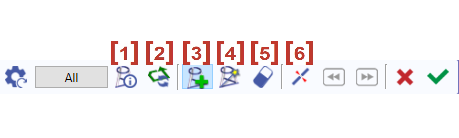
Once the profiles are done, the dialog bar appears : Click on About the profile [1] . A message box give you the characteristics of the 2 profiles selected, number of elements, number of synchro points.
3/ Senkron noktalarını tanımlamak için
|
|
Profil Hakkında |
|
|
Seçilen profilin yönünün tersine çevrilmesi |
|
|
Senkron Ekleme - Senkron noktalarının manuel oluşturulması |
|
|
2 bölge arasında senkron noktalarının otomatik oluşturulması. ' Hepsi ' düğmesine tıklayın ve tüm profiller için oluşturma otomatik olarak yapılır. |
|
|
Bir senkron noktasına tıklayarak silinmesi. |
|
|
Bir elemanın kesilmesi |
Yeşil tik ' Diğer profil ' üzerine tıklayarak onaylayın veya 2 başka profil üzerinde senkron noktası oluşturun.
Oluşturulan tüm senkron noktalarını iptal etmek için kırmızı çarpıya tıklayın.
Senkron noktaları oluştururken manuel ve otomatik oluşturmayı birleştirebiliriz. Bu, yukarıdaki ikinci örnekte açıklanmaktadır.
Otomatik yöntem
|
Click on [1] . There are 7 elements on a profile and 11 in the other one. It can be machined with the cycle 4 axes contour/contour but it is not optimized. If you want to optimize the toolpath, you have to set up synchro points. |
|
|
The synchro point can only be defined on existing points or elements extremities. You have to cut an element : click on [6] and then click on the arc, you can move the cursor all along the element, click on the screen when you want to cut. A circle (tangency) or a square (sharp angle) is displayed where you cut. |
Beyaz imleçle yayın kesilmesi 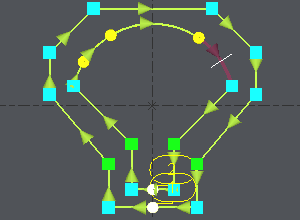
|
|
The number of elements is now the same on the 2 profiles : Click on [4] ve ardından ' Hepsi ' üzerine tıklayın, 2 profilin tüm uçları 2'şerli olarak bağlanır. |
Senkron noktaları otomatik olarak oluşturulur 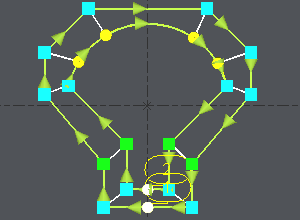
|
Manuel ve otomatik yöntemlerin birleşimi
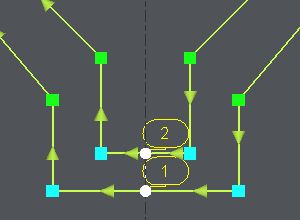
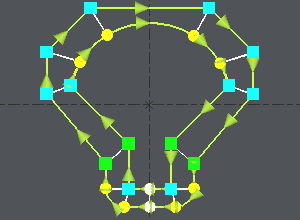
Aynı örnek ama 2 köşe daha fazla alalım. Burada çift senkron noktaları oluşturmamız gerekecek ve bu otomatik modda mümkün değildir:
|
Click on [1] to have information about the 2 profiles. |
|
|
Click on [3] , click on the angle (blue square) and click on an extremity of the corner (yellow circle), click again on the angle (blue square), a message warns you about the creation of a double synchro point, click on OK and click on the other extremity of the corner (yellow circle). Aynı işlemleri diğer köşede tekrarlayın. |
|
|
The synchro point can only be defined on existing points or elements extremities. You have to cut an element : click on [6] and then click on the arc, you can move the cursor all along the element, click on the screen when you want to cut. A circle (tangency) or a square (sharp angle) is displayed where you cut. |
|
|
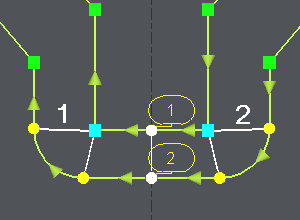
We want to create synchro points between the 2 corners already treated : click on [4] , işlenecek bölgeyi sınırlamak için önceden tanımlanmış 2 senkron noktasına tıklayın (" 1 ve 2 resimde) 2 profilin tüm uçları 2'şerli olarak bağlanır. |
Once the synchro points are set up, click on [1] to obtain information for the synchro points created , if the machining is possible you are told about it. Then you can go to the machining editor and choose the cycle 4 axes cnt/cnt.